11.3 Working with credential profiles
The Credential Profiles workflow contains a number of stages. To move between the stages, click Next.
Note: You cannot go back to a previous stage. If you forget to select something, either start the workflow again immediately (all your changes will be lost) or complete the workflow and then modify the profile.
The Credential Profiles workflow is in the Configuration category. When you start the workflow, basic details of the profile shown in the Select Credential Profile field are displayed.
You can also launch this workflow from the Credential Configuration section of the More category in the MyID Operator Client. See the Using Credential Configuration workflows section in the MyID Operator Client guide for details.
- To create a new profile, click New.
- To modify an existing profile, select it from the Select Credential Profile list then click Modify.
- To create a profile based on an existing profile, select the profile you want to copy from the Select Credential Profile list then click Copy.
- To delete a profile, select it from the list in Select Credential Profile then click Delete. You are prompted to confirm your request.
Note: You cannot delete a profile that has issued credentials. You must cancel the credentials before you can delete the profile.
Click Details to see the details of the credential profile.
11.3.1 Credential profile options
If you are creating a new profile, give the credential profile a Name and optional Description. You can change existing details if necessary.
Note: Operators may have to choose a profile when issuing or requesting credentials. Use the Name and Description to provide information on which profile to choose.
You can also specify a Device Friendly Name that will be displayed during card selection operations in the Self-Service App or the MyID Operator Client to help users select the appropriate card.
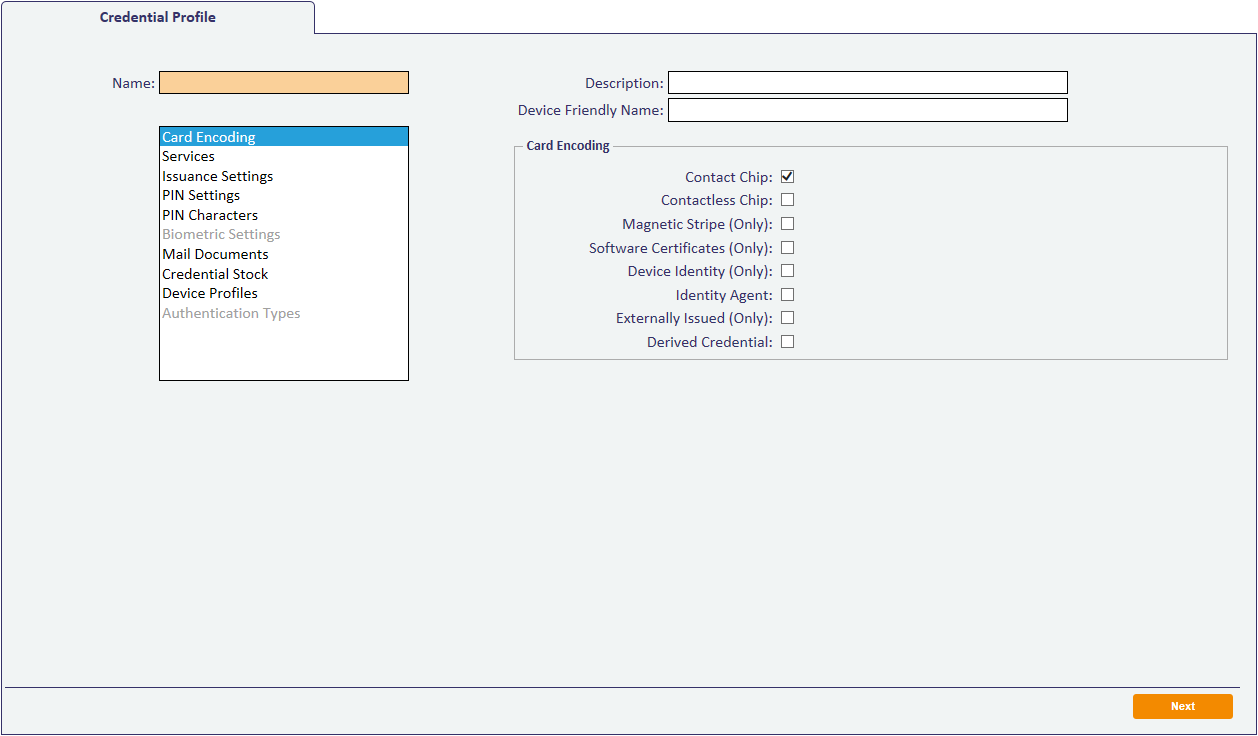
Each of the entries below the Name of the profile is associated with a set of configuration options, which are displayed below the Description. Depending on the type of card you are using, you may not see all of the entries.
Note: This section describes the options available to you without setting any further system configuration options. See section 11.3.2, Additional credential profile options for details of other credential profile options that may be available.
11.3.1.1 Card Encoding
Select the features you want to use on the card. You must select one or more of:
- Contact Chip – the card must contain a contact chip.
-
Contactless Chip – the card must have a contactless chip.
If the card has a single chip with two interfaces (contactless and contact) and you want to program both, do not select this option – the card will be programmed through the contact chip. Select this option for contactless-only issuance.
- Magnetic Stripe (Only) – the card contains no chips, but has only a magnetic stripe. If your card has a magnetic stripe in addition to a chip, you do not need to select this option.
-
Software Certificates Only – no card is required, and the certificates are issued only in software.
See section 11.5, Setting up a credential profile for soft certificates for details.
-
Device Identity (Only) – if these credentials are only going to be used to determine the identity of a device (a computer, router or other device), select this option.
See section 24.5, Setting up a credential profile to use to issue device identities for details.
-
Identity Agent – used for mobile identities.
See the Setting up the Identity Agent credential profiles section in the Mobile Identity Management guide.
-
Externally Issued (Only) – used for credentials that were originally issued by a different system and have been imported into MyID; for example, this is used for derived credentials for unknown users.
-
Derived Credential – used for derived credentials.
See
Depending on your system configuration, you may have additional options in this list:
- Microsoft Virtual Smart Card – used for Microsoft VSCs. See the Setting up a credential profile for VSCs section in the Microsoft VSC Integration Guide.
- Windows Hello – used for Windows Hello for Business credentials. See the Creating the Windows Hello credential profile section in the Windows Hello for Business Integration Guide.
11.3.1.2 Services
Select the following options:
- MyID Logon – select this option if you want the credentials to be used to logon to MyID.
-
MyID Encryption – select this option if you want to be able to encrypt data.
If you want to issue archived certificates, you must select the MyID Encryption service.
You can select certificates to be mapped to these services; the signing certificate is used for MyID Logon, and the encryption certificate is used for MyID encryption.
If no certificates are mapped to the logon and encryption services, an additional Manager Keypair is generated on the smart card for these services.
Note: Not all cards or devices support manager keypairs. You are recommended to select certificates for signing and encryption.
11.3.1.3 Issuance Settings
Specify how the credentials are issued and how long they remain valid.
-
Validate Issuance
If you set this option, credentials issued using this profile will require secondary authorization – either a witness during the issuance process, or a validation of the request.
-
Validate Cancellation
If you set this option, credentials issued using this profile will require secondary authorization when you cancel them.
-
Lifetime
The Lifetime setting determines the number of days for which the credentials will be valid. The initial default value is
Note: You can also choose to set an explicit expiry date at the point at which you request the card, rather than when you set up the credential profile; see the Setting expiry dates for a card section in the Operator's Guide for details.
Note: You must make sure that the lifetime of the credential is appropriate for your purposes; once the credential expires, you can no longer issue new certificates to the card, and you must request a replacement
If you do not require a fixed lifetime, and do not want to request card replacements periodically, you are recommended to
The lifetime also affects the renewal of certificates; see section 6.6.1, Credential lifetimes and certificate renewal.
-
Only Issue to Known Serial Numbers
If you set this option, MyID must already have a record of the serial number of the card or token before credentials can be issued to it. See section 10, Importing serial numbers for details.
-
Issue Via Bureau
If you are using a bureau to issue credentials, set this option.
Note: Bureau issuance requires an additional module. Contact customer support quoting reference SUP-233.
-
Lock User PIN at Issuance
If you set this option, the card is locked after it is issued, and must be unlocked before it can be used.
Note: If you set this option, it may fail in certain scenarios (for example, when certificates are written to a card using vendor middleware, MyID may be denied access to lock the card on completion).
-
Disable Card at Issuance
If you set this option, the card and credentials are issued in a disabled state. An operator must enable them before they can be used.
You can use Issue Card, Collect Card or Batch Collect Card to issue the cards. This allows you to print and personalize the cards, but does not make them available for use.
An operator must enable the card before the user can use it.
-
Issue Additional Identities
Used for additional identities. See section 25, Additional identities.
-
Key Recovery Only
Used for key recovery operations. See section 19, Key recovery for details.
-
Require Activation
Used for card activation. If you do not want to use activation, select No; for all other options, see section 23.1, Configuring a credential profile for activation.
-
Pre‑encode Card
Used for card activation. See section 23.1, Configuring a credential profile for activation for details.
-
Require Fingerprints at Issuance
Used to specify whether fingerprints are required when issuing a card. See section 11.3.2.8, Authentication methods for details.
-
Require Facial Biometrics
-
System Default – the requirement is based on the PIV Facial Biometrics Required configuration option.
When you upgrade an existing system, the default value for existing credential profiles is System Default.
- Always – facial biometrics are always required for issuance of cards using this credential profile. The PIV Facial Biometrics Required configuration option is ignored.
- Never – facial biometrics are never required for issuance of cards using this credential profile. The PIV Facial Biometrics Required configuration option is ignored.
Note: The Enforce biometrics at request configuration option (on the Biometrics page of the Operation Settings workflow) can enforce the Require Facial Biometrics option in the credential profile for requests made using the MyID Operator Client.
The Require Facial Biometrics option is enforced at issuance, but the Enforce biometrics at request option makes sure that a request cannot be created, thereby catching the issue with the person's biometrics at an earlier stage.
-
-
Terms and Conditions
Note: The primary use of Terms and Conditions is when the holder has to activate the card; for example, when you have set the Require Activation option. You can also use terms and conditions for self-service collection of cards that do not require activation, or for self-service collection of VSCs. Terms and conditions are not displayed in the Collect Card workflow, but are displayed for Collect My Card.
For details, see section 23.2, Terms and conditions.
-
Terms and Conditions Template
If you require the cardholder to sign terms and conditions, depending on the method used for the workflow, you may have to specify an HTML template to be used for the terms and conditions text.
For details, see section 11.6, Customizing terms and conditions.
- Credential Group – see section 11.3.2.1, Credential group for details.
- Exclusive Group – see section 11.3.2.2, Exclusive Group for details.
- Block Multiple Requests for Credential Group – see section 11.3.2.4, Block Multiple Requests for Credential Group for details.
-
Enforce Photo at Issuance – select one of the following options:
- No – you can issue cards if the cardholder does not have a photo.
- Request and Issuance – you cannot request or issue a card if the cardholder does not have a photo.
- At Issuance Only – you can request a card, but if the cardholder does not have a photo you will be unable to issue or activate the card.
-
You can set up MyID to check the proximity serial numbers of the HID PROX‑capable PIV cards you are issuing. See section 10, Importing serial numbers for instructions on importing serial numbers into MyID.
This option affects the Collect Card and Batch Collect Card workflows only; if you collect a card by any other method (for example, using the Self-Service App) this option is ignored.
Important: This feature requires that you are using a card reading device capable of detecting the proximity serial number; for example, a Fargo 5000 printer that contains an embedded Omnikey 5125 reader. If MyID cannot detect the proximity serial number using a prox reader, it will not issue the card if you have set this option to Must be a Proximity Card or Must be a Known Proximity Card.
Note: Depending on the cards you are using, your system may need to be customized to allow MyID to use the proximity serial numbers. The default implementation expects the serial number to be in the "HID Corporate 1000" or "HID H10302" format. If you need to support other proximity serial number formats, contact customer support for more information quoting reference SUP-77.
MyID can integrate your PROX cards with your PACS operation; contact Intercede professional services for details.
Select from:
- None – MyID does not check for the existence of a proximity feature on the card. No association with the contactless chip is created.
- Must be a Proximity Card – MyID checks that the card is a proximity card. The contactless chip will be associated with the user.
- Must be a Known Proximity Card – MyID checks that the card is a proximity card, and that the proximity serial number has previously been imported to MyID using the Import Serial Numbers workflow. The contactless chip will be associated with the user.
-
The Notifications feature allows email and URL notification schemes to be triggered when specific events in MyID occur, such as issuing a card, canceling a card or completing a workflow.
MyID provides notification schemes to be used when requesting a mobile device through the MyID Operator Client or MyID Core API; see the Configuring SMS and email notifications for the MyID Operator Client and Creating the Identity Agent credential profile sections in the Mobile Identity Management guide.
For non-mobile devices, notification schemes require additional customization. Contact customer support quoting reference SUP-188 for details.
MyID also supports two-way SSL for notifications.
-
Require user data to be approved
If you select this option, MyID prevents credentials from being issued unless the user has the User Data Approved flag set on their account.
See section 27.1, User Data Approved checks for details of setting this option.
You can also use this feature in conjunction with the vetting date check to ensure that credentials are not issued to people whose identity checks have expired. See section 27, Identity checks for details.
-
Constrain certificate lifetime to vetting date
When certificates are issued to this device, their expiry date will not exceed the vetting date of the recipient, regardless of the expiry date of the device.
For more information about vetting dates, see section 27, Identity checks.
-
Secondary Credential
Set this option if the credential being issued is not the cardholder's primary credential. MyID will not assign ownership of recovered historic certificates to secondary credentials.
-
Generate Code on Request
Used to send a one-time logon code to the cardholder when the credential is requested. The cardholder can use this code to log on to MyID and collect their credential. See section 3.4, Logon using codes for details.
-
Require Challenge
Used only when Device Identity (Only) is select in the Card Encoding section. When requesting a device identity for a SCEP-compliant device, you can choose whether to display the one-time challenge code on screen or send an email message containing the challenge code. See section 24.8, Requesting a device identity for details.
-
Unrestricted Cancellation
Allows you to re-use a card without first canceling it. Even if the card has already been issued, this allows you to issue the card or assign it to a request; the previous credentials will automatically be canceled with a status mapping of "Lost" (for Collect My Card and Issue Card) or "Cancel temporary card during replacement" (for Collect Card) and a comment indicating that the card was canceled by the unrestricted cancellation feature.
This option allows you to use, for example, a pool of temporary cards for visitors that you can issue and re-use immediately without having to cancel them first.
Note: In the Collect Card workflow, a card that has been issued with the Unrestricted Cancellation option is listed as Not Issued on the card selection screen.
This option appears only if the Enable unrestricted cancellation option on the Issuance Processes tab of the Operation Settings workflow is set to Yes.
-
OPACITY
Select one of the following options:
- None – Do not attempt to perform OPACITY personalization.
- OPACITY without Pairing Codes – Personalize the OPACITY CVC but do not set an OPACITY pairing code.
- OPACITY with Pairing Codes – Personalize the OPACITY CVC and generate and set an OPACITY pairing code.
For more information on setting up OPACITY, see the Setting up OPACITY section in the Smart Card Integration Guide.
-
Send Pairing Code Emails
When the card is issued, send an email to the cardholder containing the OPACITY pairing code.
-
Ignore User Expiry Date – set this option if you want to be able to issue devices with lifetimes that exceed the Maximum credential expiry date set for the person.
Note: This setting affects requests made through the MyID Operator Client only. For more information, see the Requesting a device for a person section in the MyID Operator Client guide.
-
Verify Fingerprints During Card Update – set this option to control whether the cardholder must provide their fingerprints when their device is being updated in the operator-led Collect Updates workflow.
See the Collect Updates workflow section in the Operator's Guide.
-
Verify Fingerprints During Reset PIN – set this option to control whether the cardholder must provide their fingerprints when their device is having its PIN reset using the Reset PIN workflow.
See the Resetting a card's PIN section in the Operator's Guide.
11.3.1.4 Self-Service Unlock Authentication
Note: Currently, you cannot use the Self-Service Unlock Authentication options to configure the authentication requirements for Identity Agent-based credential profiles.
To allow users to unlock their own credentials, you must set the Self-service Unlock option (on the Self-Service page of the Security Settings workflow) to Yes. This is a global setting.
You can set the following global authentication option
- Ask Security Questions for Self Service Card Unlock – on the PINs page of the Security Settings workflow.
-
Biometric PIN Reset and Verify fingerprints during card unlock – on the Biometrics page of the Operation Settings workflow.
If you have configured both security questions and biometrics, the biometric authentication takes precedence, as it is the more secure option.
You can also override these options using the Self-Service Unlock Authentication section of the credential profile.

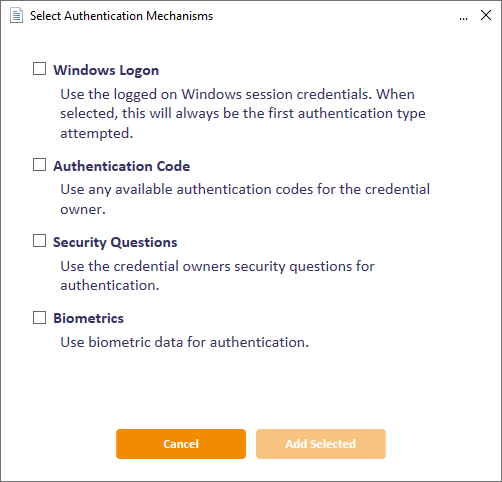
To set the self-service authentication methods:
- Select the Credential owners must authenticate using one of the methods below in the order shown option.
-
Click Add.

-
Select the authentication methods you want to use, then click Add Selected.
To change the order, select the logon mechanism and click Move Up or Move Down.
Note: If you have Windows Logon in your list, it stays at the top of the list – Windows authentication is carried out before any interactive authentication methods. If Windows authentication is successful, the user continues; if it is unsuccessful, the user is presented with the next logon mechanism in the list.
To remove an option, select the logon mechanism and clock Remove.
See the Self-service PIN reset authentication section in the Operator's Guide for more details.
11.3.1.5 MDM Restrictions
Available only if you have set the Card Encoding options to Identity Agent and Derived Credential.
Allows you to set restrictions for mobile identities issued using a Mobile Device Management system.
See the Configuring credential profiles for MDM restrictions section in the Mobile Identity Management guide for details.
11.3.1.6 PIN Settings
Note: You may be able to create a set of PIN options that make it impossible to log in. For example, if you set the Maximum PIN Length to 4, and the Minimum PIN Length to 4, you might expect to be able to enter 4-digit PINs. However, if the card does not allow you to change the minimum length and has this value set to 6, you end up with a card which cannot be issued – you cannot enter a PIN that is 4 characters or less, and 6 characters or more.
The options available depend on the card type you are using. You may not be able to change some options on all card types, as they are set at manufacture.
Note: You must make sure that the PIN settings you select match the capabilities of the smart cards you are issuing. Note also that some workflows within MyID (for example, batch and activation workflows) may generate temporary random PINs for the card, based on the settings you have specified in the PIN Settings section of the credential profile; if these settings do not match the PIN capabilities of the smart card, the batch issuance or encoding may fail.
The mandatory settings, with initial default values shown in brackets, are:
-
Authentication Mode (PIN)
This setting specifies the authentication mode for the issued credential; that is, how the owner of the credential will authenticate to access the credentials. For example, most smart cards use the PIN as the method of authentication. Some device types have extended capabilities; for example, fingerprint match on card. Other device types may manage this setting externally from MyID. This field is usually automatically set depending on the encoding type selected in the credential profile; do not change this option unless specified in the appropriate integration guide for the device type.
- Maximum PIN Length (12)
- Minimum PIN Length (4)
-
Repeated Characters Allowed (0)
Set to the maximum number of repeated characters in the PIN.
For example, if you set this value to 3:
- 333999000 – is allowed.
- 333399000 – is not allowed.
Set this value to 0 to allow any number of repeated characters.
-
Sequential Characters Allowed (0)
Set to the maximum number of sequential characters in the PIN.
For example, if you set this value to 3:
- 123987456 – is allowed.
- 123487456 – is not allowed.
Set this value to 0 to allow any number of sequential characters.
-
Logon Attempts (5)
Set to the number of incorrect PINs you can enter before the card is locked.
Note: This setting is supported only for cards that support on-card PIN policy settings; see the PIN policy settings section of the appropriate chapter in the Smart Card Integration Guide for details.
- PIN Inactivity Timer (180 minutes)
-
PIN History (0)
Note: If the PIN History option is supported, it indicates the number of previous PINs to remember. You cannot reuse a remembered PIN. If your smart cards support this feature, it will be specified in the PIN policy settings section of the appropriate chapter in the Smart Card Integration Guide for details.
-
From the Issue With drop-down list, select one of the following:
- User specified PIN – the user types the PIN when the card is issued. This is the default option.
- Client Generated PIN – the PIN is generated on the client PC. Type the Length for the PIN.
-
Server Generated PIN – the PIN is generated by the MyID server. See section 9, PIN generation for more information. Complete the following details:
- Length – the length of the generated PIN. The maximum length is 16 characters.
- PIN Algorithm – select the PIN generation algorithm. You can select one of the following:
- EdeficePinGenerator – creates a PIN using a known algorithm, a PIN generation key, and the card serial number as diversification data. You can regenerate the same PIN on another system as long as you have the algorithm, PIN generation key, and the card serial number.
- RandomPinGenerator – creates a random numeric PIN that is guaranteed not to contain the user's logon name or
- Protected Key – select the PIN generation key you added using the Key Manager workflow. This option is required for EdeficePinGenerator but not for RandomPinGenerator.
-
Email PIN
To email the PIN to the user when the card is issued, select the Email PIN option. This option is available only when the Issue With option is set to Client Generated PIN or Server Generated PIN.
Important: If you are using the RandomPINGenerator algorithm for server generated PINs, the PIN is displayed on screen only during the Issue Card workflow – if you are using any other workflows to issue the card, you must do one of the following:
- Select the Email PIN option, and configure MyID to send email notifications; if you do not email the PIN to the cardholder when the card is issued, it is not possible to determine the PIN.
- From the Select PIN Mailing Document option, select the name of the HTML template stored in the MyID database to be used to generate a PIN mailing document for use in the Collect Card and Batch Collect Card workflows.
-
Set this option to issue the smart card with Global PIN support.
Global PIN is an alternative PIN for supported PIV cards that allows a wider range of characters than the standard numeric-only user PINs. The smart card must support this feature. See the Global PIN support section of the Smart Card Integration Guide.
-
Reset PIN to Secure Value – if you want to create a server-generated PIN when using the Reset Card PIN workflow, select one of the following options:
-
EdeficePinGenerator – uses the same algorithmic PIN generator as for issuance PINs above. If required, you can create a PIN mailer to be sent to the cardholder using the Select PIN Reset Document option in the Mail Documents section of the credential profile.
You must select the PIN generation key to use from the Reset PIN Protected Key drop-down list.
- RandomPinGenerator – creates a random numeric PIN that is guaranteed not to contain the user's logon name or
See section 9, PIN generation for more information.
-
- Reset PIN Protected Key – select the PIN generation key you added using the Key Manager workflow. This option is required only if you select EdeficePinGenerator from the Reset PIN to Secure Value option.
-
Enforce Banned Words – for user specified PINs, you can select this option to prevent the user from using particular words in their PINs.
See section 11.7, Enforcing banned words in PINs for more information.
11.3.1.7 PIN Characters
Specify the type of characters that must, may or must not be contained in the PIN.

Note: Make sure that the cards you are using support the combination you select by checking the relevant integration guide. Some cards do not allow the PIN rule enforcement to be stored on the card; MyID will enforce the PIN rules, but external software may be able to change the PIN on the card without the rules being enforced.
If you are using an authentication service to issue one time passwords on the card, you must make sure that the PIN restrictions in the credential profile are the same as the PIN restrictions on the authentication service.
11.3.1.8 Mail Documents
There are two systems for mailing documents.
For Microsoft Word-based mailing documents:
- Select Card Issuance Mailing Document – select the Microsoft Word mail merge template to be used in the Print Mailing Document workflow.
-
Select Enable Card Mailing Document – select the Microsoft Word mail merge template to be used when credentials issued with this profile are enabled.
Note: The mail merge document should be stored on the workstation used for issuing credentials. See section 11.4, Setting up mail merge documents for more details.
For HTML-based mailing documents:
-
Select PIN Mailing Document – select the name of the HTML template stored in the MyID database to be used to generate a PIN mailing document for use in the Collect Card and Batch Collect Card workflows.
You can also use this mailing document to provide OPACITY pairing codes. See the Distributing the pairing code section in the Smart Card Integration Guide for details.
You can also use this template to print PIN mailing documents for soft certificate packages using the Print Mailer Document option in the MyID Operator Client. See section 11.5, Setting up a credential profile for soft certificates.
-
Select PIN Reset Document – select the name of the HTML template stored in the MyID database to be used to generate a PIN mailing document for use in the Reset Card PIN workflow.
-
Select Transport Document – select the name of the HTML template stored in the MyID database to be used when collecting a soft certificate package. See section 11.5, Setting up a credential profile for soft certificates.
For details of configuring HTML templates, contact customer support, quoting reference SUP-255.
11.3.1.9 Credential Stock
This is used only if you are using a bureau to issue cards.
11.3.1.10 Device Profiles
The Card Format drop-down list contains the available data model files. These files are used to specify the structure of the electronic data written to cards. Select None from this list unless you are specifically instructed to select another option by the integration guide for your credentials
When you import cards and tokens (for example, for one time password tokens) the capabilities of the object are stored in a data profile. Load this data profile to populate the credential profile with device-specific settings.
11.3.1.11 Requisite User Data
Note: This section appears only if you have selected the Requisite User Data option on the Issuance Processes tab of the Operation Settings workflow.
Contains a list of user attributes that must be present for this credential profile to be issued.

You can use this option to restrict the issuance of credentials to users with the appropriate attributes; for example, if the credential is to be used for email signing, you must select Email from the list, and provide an appropriate certificate for email signing – only users who have the Email attribute mapped in their user account will be able to receive a credential based on this credential profile. Similarly, if your credential is to be used for Windows Logon, you must select User Principal Name from this list, and provide an appropriate certificate for logging on to Windows. For Windows authentication, you must select User SID in this list, and provide a certificate that has the user security identifier attribute mapped; see section 6.9, Including user security identifiers in certificates.
For each user attribute, you can select the following options:
-
Not required – The user does not need a value set for this attribute.
-
Required for Request – The user must have a value set for this attribute before a credential request can be created for the user, and also when validating or collecting the request.
-
Required for Validate / Collect – The user must have a value set for this attribute before the credential request can be validated or the credential collected.
-
Required Value(s) – Optionally, a comma-separated list of required values for the attribute. If the Required for Request or Required for Validate / Collect option is selected, and this field is blank, then any value is accepted. If one of the Required... options is selected, and this field contains one or more possible values, the attribute must contain one of these values to be accepted.
Note: You can use only the following characters in this field:
a-z A-Z 0-9 ' - @ .
and the space character.
Important: If you are using a field where the values are controlled by the SelectOptions table, the values you provide must match the entries in the Value field in the SelectOptions table, not the DisplayValue field. This does not currently apply to any of the default set of requisite fields, so you can ignore this requirement if your system does not have a customized list of requisite user data options.
You can select the following user attributes:
- Address 1
- Address 2
- Cell
- City
- Employee ID (displayed in the View Person workflow in MyID Desktop as the Security field)
- PIV Distinguished Name
- State + Zip
- User Principal Name
Note: These are the default available fields; depending on your system, you may have a different list, or the names of the fields may be different; for example, the Address 1 field may be called Info 1, or another, custom, value. If your system implementation has customized the Address1/Info 1 field, to ensure that a meaningful label is displayed in the user interface and in the audit record, you can update the DisplayValue for this option in the SelectOptions table in the database:
UPDATE [dbo].[SelectOptions]
SET [DisplayValue]=N'<insert translated text here>'
WHERE [SelectID]=N'CredentialProfile_Required'
AND [Value]=N'OptionalLine1';
11.3.1.12 Restricting the list of credential profiles displayed
You can configure your system to hide any credential profiles that do not meet the Requisite User Data requirements by setting the Show Disqualified Credential Profiles option to No.
Note: This setting affects the display of credential profiles in the MyID Operator Client only.
To hide disqualified credential profiles:
-
From the Configuration category, select Operation Settings.
-
Click the Issuance Processes tab.
-
Set the following option:
-
Show Disqualified Credential Profiles – set to No to hide any credential profiles that do not meet the Requisite User Data requirements.
The default value is Yes, which displays all credential profiles, whether or not they meet the Requisite User Data requirements
-
-
Click Save changes.
11.3.2 Additional credential profile options
Additional credential profile options are shown
11.3.2.1 Credential group
If you have set the Active credential profiles per person configuration option – see section 30.10, Issuance Processes page (Operation Settings) – to One per credential group, you can specify the group to which the credential profile belongs. This enables you, for example, to issue a card, a token and so on to the same person.
When you enable a credential for a user, all other credentials issued to the user that belong to the same credential group are either disabled or canceled, depending on the Cancel Previously Issued Device setting.
If you leave the Credential Group blank, a user can have many active credentials from this profile, even if the One per credential group option is set. Enabling credentials with a blank credential group does not disable or cancel any other credentials.
Note: If you change the configuration option from Many to One or to One per credential group, MyID does not automatically disable or cancel any of a user’s credentials until the next time you enable credentials for that user. Similarly, if you change the option from One or One per credential group to Many, MyID does not automatically re-enable any disabled credentials for that user.
Note: If a user is disabled, and is re-enabled when the Active credential profiles per person setting does not allow the user to have all of the credentials previously issued to them, the credentials that are re-enabled for the user are the credentials with the highest ID (that is, the credentials that were added to the MyID system most recently), not necessarily the credentials that were active at the point when the user was disabled.
Note: A mobile identity on a single physical device may contain multiple logical devices (the Identity Agent itself, and separate devices for the credential stores) but for the purpose of this feature is treated as a single credential.
11.3.2.2 Exclusive Group
If you provide a value in this field, MyID prevents you from requesting or collecting credentials if the cardholder has an issued device or a request for a device that has a different value in its credential profile for its Exclusive Group.
You can request and collect as many credentials as you require that have the same Exclusive Group value. You can also request and collect as many credentials as you require that have no value in their Exclusive Group.
MyID checks the latest version of the relevant credential profiles, not the versions that were used to request or collect the device, when checking whether you can request or collect a device. MyID also checks the exclusive groups at request, validation, and collection; the cardholder's list of issued or requested devices, and the exclusive group settings of the credential profiles used to issue or request devices, may change between the request and the collection.
For example, if you have the following credential profiles:
-
ContractorA – has an Exclusive Group of Contractor.
-
ContractorB – has an Exclusive Group of Contractor.
-
EmployeeA – has an Exclusive Group of Employee.
-
UniversalA – has no Exclusive Group.
You can request and collect the following credentials to the same cardholder:
-
ContractorA, ContractorB – a combination of two Contractor credentials.
-
ContractorA, ContractorB, UniversalA – a combination of two Contractor credentials and one with no exclusive group.
-
ContractorA, UniversalA – a combination of Contractor and no exclusive group.
-
ContractorB, UniversalA – a combination of Contractor and no exclusive group.
-
EmployeeA, UniversalA – a combination of Employee and no exclusive group.
But you cannot issue the following credentials to the same cardholder:
-
ContractorA, EmployeeA – a combination of Contractor and Employee exclusive groups.
-
ContractorB, EmployeeA – a combination of Contractor and Employee exclusive groups.
11.3.2.3 Exclusive group messages
The message when you attempt to request a device that is not permitted due to the exclusive group configuration is similar to the following:
-
In the MyID Operator Client:
The user has an existing request or device that exists with a different exclusive group, the request cannot be added.
Error number: WS50055
-
In MyID Desktop:
Error: Unable to request credential.
Cause: The credential could not be requested because the user has a request or a credential with a different exclusive group.
Solution: To request a new credential, either cancel any pending requests or credentials that are within a different group.
The message when you attempt to validate a device that is not permitted due to the exclusive group configuration is similar to the following:
-
In the MyID Operator Client:
The user has an existing request or device that exists with a different exclusive group, the request cannot be validated.
Error number: WS50056
-
In MyID Desktop:
Error: Unable to validate credential.
Cause: The credential could not be validated because the user has a request or a credential with a different exclusive group.
Solution: To validate this credential, either cancel any pending requests or credentials that are within a different group.
The message when you attempt to collect a device that is not permitted due to the exclusive group configuration is similar to the following:
-
In the Collect Card workflow (whether launched from MyID Desktop or from the MyID Operator Client):
Validation Error
An existing request or device exists with a different exclusive group.
11.3.2.4 Block Multiple Requests for Credential Group
Set this option to prevent an operator from creating a request for a person if they already have an outstanding request for a device with the same credential group. The operator will also be prevented from approving a request if the person has an outstanding request for a device with the same credential group.
Note: This affects operations carried out in the MyID Operator Client only. It does not affect requests made through MyID Desktop or the Lifecycle API. This feature does not support mobile issuance.
11.3.2.5 Cancel Previously Issued Device
If you set this option, instead of disabling any previously-issued device because of the action of the Active credential profiles per person configuration option and Credential Group setting in the credential profile, MyID cancels the previously-issued devices.
11.3.2.6 Issue over Existing Credential
Available for mobile derived credentials issued through an MDM only. When this option is set, if the device is already issued to the target user, it is automatically canceled and then the new device issued. Existing signing certificates are revoked, but existing archived certificates are not revoked. If the device is issued to a different user, the collection fails.
Note: The credential profile used for the existing issuance does not affect this behavior; existing credentials are overwritten only if the credential profile for the new credential has the Issue over Existing Credential option set.
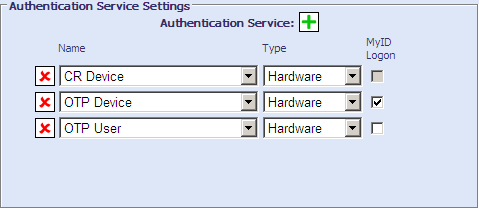
11.3.2.7 Authentication Service Settings
If you want to issue software one time passwords, if your credentials operate as a one-time-password hardware token, or if you want users to be able to use virtual one time password tokens, set the authentication service options.
Note: These options are only displayed if token logon is enabled.
If you selected a device profile, the number and type of options available here are limited to the capabilities of the selected device, and you do not need to click the add button. You must make sure that you have added authentication services that correspond to the device's capabilities using the External Systems workflow.
Click the add  button. You can add several authentication services to a credential profile.
From the Name drop-down list, select the authentication service (as set up in the External Systems workflow for your authentication service – see the integration guide for your authentication service for details) then select Hardware, Software or Virtual from the Type drop‑down list:
- Hardware – the card acts as a hardware one time password token.
- Software – the card contains software one time passwords.
- Virtual – the authentication service is informed that the user can use virtual one time passwords.
11.3.2.8 Authentication methods
The Require Fingerprints at Issuance and Activation Authentication options allow you to specify how the cardholder authenticates their identity to issue or activate.
Note: The Enforce biometrics at request configuration option (on the Biometrics page of the Operation Settings workflow) can enforce the Require Fingerprints at Issuance option in the credential profile for requests made using the MyID Operator Client.
The Require Fingerprints at Issuance option is enforced at issuance, but the Enforce biometrics at request option makes sure that a request cannot be created, thereby catching the issue with the person's biometrics at an earlier stage.
|
Scenario |
Require Fingerprints at Issuance |
Activation Authentication |
|---|---|---|
|
No authentication at issuance or activation |
Never Required |
None |
|
Biometric authentication at issuance or activation |
Always Required |
None |
|
Biometric authentication at issuance or activation |
N/A |
Biometric |
|
Code authentication at activation |
Never Required |
Authentication Code |
|
Biometric authentication at issuance, and biometric authentication and code authentication at activation |
Always Required |
Authentication Code |
Note: You cannot use authentication codes for face-to-face issuance.
11.3.2.9 Additional authentication
If you want to use the additional authentication system to use authorization codes to issue devices, you must carry out the following procedure.
- In the Configuration category, select Operation Settings.
-
Click the Biometrics tab. Make sure the Enable additional authentication options option is set to Yes.
This makes the following options visible in the Credential Profiles workflow:
- Require Fingerprints at Issuance – you are recommended to leave this set to System Default.
- Activation Authentication – allows you to specify biometric authentication or authentication codes for activation.
- Minimum fingerprint quality – do not type a value. This setting is reserved for future use on biometric devices that support fingerprint quality ratings.
-
Set up your credential profile as follows:
- Set the Require Activation option to Allow self collection or Assisted activation only.
-
Set the Activation Authentication option to one of the following:
- Biometric – biometric authentication is used to activate or unlock the card.
- Authentication Code (Manual) – an authentication code is required to activate the card. An operator must request an authentication code.
- Authentication Code (Automatic) – an authentication code is required to activate the card. An authentication code is emailed to the applicant when the card is issued.
- Request a card for the applicant, specifying the credential profile that has the activation authentication options.
-
Collect the card for the applicant.
- If the Activation Authentication option was set to Authentication Code (Automatic), an email that contains an authentication code is sent to the applicant.
- If the Activation Authentication option was set to Authentication Code (Manual), you must request an authentication code using the Request Auth Code or Card Ready Notification workflow. You can also request an authentication code for card activation using the MyID Operator Client; see the Sending an authentication code to activate a device section in the MyID Operator Client guide for details.
The card is now in a state in which it can be collected, and the applicant has the necessary authentication code sent by email.
-
If the Require Activation option was set to Allow self collection, the applicant takes their own card and logs in to MyID, and activates it using the automatic Activate Card workflow.
If the Require Activation option was set to Assisted activation only, an operator uses the Assisted Activation workflow to activate the card for the applicant.
11.3.3 Selecting certificates
Note: If you are not using certificates, click Next to skip this page.
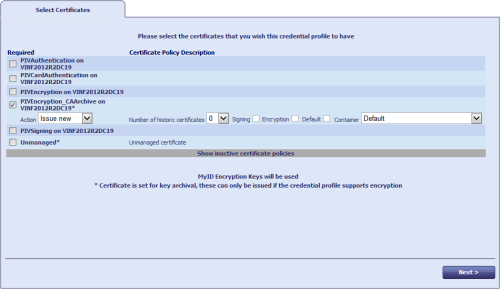
This page lists all of the available certificate policies you can issue to a credential.
The Unmanaged option allows you to issue a certificate stored in a PFX file; for example, for mobile credentials.
You can click Show inactive certificate policies – this displays a list of certificate policies that were previously issued but are now disabled. You cannot issue new certificates based on these policies, but you can choose to recover a number of historic certificates.
To select certificates:
-
Select the Required checkbox for the certificate policy you want to issue to the credential.
-
If the certificate policy is set for key archival (there is an asterisk * next to the policy name) select the following options:
-
Action – select one of the following options:
-
Issue new – a new certificate based on this policy will be issued.
Note: For Unmanaged certificate policies, you cannot select Issue new. The certificate is recovered from the PFX file, not issued from the CA.
-
Use existing – if a certificate based on this policy has been issued to the user before, and the certificate is live and unexpired, it is recovered onto the credential. If there are no available archived certificates, a new certificate is issued.
Note: This option is not available if the Card Encoding is set to Software Certificates Only.
-
Historic Only – if a certificate based on this policy has been issued to the user before, the certificate is recovered onto the credential. If there are no available archived certificates, no new certificate is issued.
Note: This option is not available if the Card Encoding is set to Software Certificates Only.
Note: When you select an Action from the list, the Number of historic certificates field is reset to the default for that action.
-
-
Number of historic certificates – the maximum number of historic certificates to recover onto the credential. If there are more historic certificates available than the maximum allowed, the most recent certificates are issued.
Note: If your credential supports storing fewer historic certificates than are specified in the credential profile, the most recent certificates are recovered; for example, if you specify four historic certificates in the credential profile, but your smart card can store only two historic certificates, the two most recent historic certificates are recovered.
-
-
For archived and non-archived policies, set the following options:
-
Signing – if you selected MyID Logon in the Services section of the credential profile, you can select one certificate to be used for signing.
If you selected MyID Logon but do not select a certificate, MyID will generate a keypair for the credential to be used for signing instead of a certificate. Note, however, that PIV cards cannot use these generic keys, so you must select a certificate.
-
Encryption – if you selected MyIDEncryption in the Services section of the credential profile, you can select one certificate to be used for encryption.
Note: Do not select a certificate for encryption that has been marked as for signing in the Certificate Authorities workflow. You cannot use a signing certificate to perform encryption or decryption.
This option determines which key is used to protect sensitive data such as archived keys in transit to the client:
- For PIV cards, this key is not used for archived certificates; however, you must still select the MyID Encryption in the Services section of the credential profile, and select a certificate to be used for encryption.
- For cards that use minidrivers, this key is used for protecting archived key material, and must be an RSA key that supports signature and key exchange. If you attempt to use an ECC key or a signature-only key, archived certificate issuance will fail.
If you selected MyID Encryption but do not select a certificate, MyID will generate a keypair for the credential to be used for encryption instead of a certificate. Note, however, that PIV cards cannot use these generic keys, so you must select a certificate.
- Default – you can select one certificate on the credential to be used as the default certificate.
-
-
If the Card Format option (in the Device Profiles section of the credential profile) supports containers, select the container on the credential in which you want to store the certificate.
Note: If you are using certificate containers, you can select only one certificate for each container.
Note: Once you have finished selecting your certificates, click Next.

11.3.4 Selecting applets
Select the applets you want to copy onto the card. Click Next.
For more information about applets, see section 7, Applets.
11.3.5 Linking credential profiles to roles
On the Select Roles page, you must select which roles can receive credentials issued using this credential profile. Select the roles in the Can Receive column.
For information about roles, see section 4.1, Roles.
Note: If you specify a role, the credential profile is immediately available for use. If you do not want it to be used yet, do not associate it with any roles.
Note: If you associate more than one credential profile with the same role, the operator must select the correct profile when requesting or issuing credentials.
11.3.6 Constrain credential profile issuer
MyID checks the operator's permissions to access credential profiles at the point at which the operator has to select a credential profile. The workflows affected include all card and ID request workflows, as well as requests for updates and replacements.
To set the option, in the Configuration category, select the Security Settings workflow and click the Process tab.
The default for this option depends on whether you were upgrading a system with existing credential profiles when you installed MyID.
- If you had existing credential profiles, this option is switched off.
- If you had no existing credential profiles or were performing a new installation, this option is switched on.
Note: If you are using a workflow that allows you to request and collect credentials in the same operation (for example, Issue Card) you need both the Can Request and Can Collect options.
11.3.7 Constrain credential profile validator
To set the option, in the Configuration category, select the Security Settings workflow and click the Process tab.
11.3.8 Constrain credential profile collector
To set the option, in the Configuration category, select the Security Settings workflow and click the Process tab.
The workflows affected include all card and ID collect workflows, batch collect, and activation workflows.
11.3.9 Constrain credential profile unlock operator
To set the option, in the Configuration category, select the Security Settings workflow and click the Process tab.
Note: This option does not affect the behavior of the Unlock Card or Remote Unlock Card workflows; it affects only the Unlock Credential and Reset Card PIN workflows.
11.3.10 Associating credential profiles with card layouts
Note: If you are not printing information on cards or have not yet designed your card layouts, you can click Next to skip this stage.
Select the card layouts that you want to be available when this credential profile is used. If you select more than one layout, the operator must decide which to use when issuing a card.
If you select more than one layout, you can click the name of the layout to select it as the default layout; this default layout will used in the Batch Collect Card workflow.
Note: To ensure that the print preview displays correctly, you must make sure that MyID is configured for the location of images. See section 8.2, Configuring the image location.
Click Next.
11.3.11 Adding comments to the credential profile
You must provide a comment for the credential profile to cover either the initial creation of the credential profile or the changes you have made.
Click Next to complete the workflow.